The Honda CB175 engine uses a dual oil-filtering system. Inside the lower crankcase is an oil separator assembly, which consists of stamped steel deflector plates held in place by a long metal rod called the separator bar. Its job is to catch oil flung off the crankshaft counterweights and help prevent oil from entering the breather system. This bar slides through the plates, locking them inside the crankcase. Once the crankcase is open, the oil separator can be removed by simply pulling out the set bar.
Table of Contents
Tools and Materials Required
- Basic tools: Metric socket/wrench set (8 mm, 10 mm), screwdrivers, long-nose pliers or pick tool.
- Other essentials: Oil drain pan, rags, flashlight, gasket scraper.
- Consumables: Liquid gasket (RTV), crankcase and cover gaskets, fresh engine oil.
- Safety gear: Gloves and eye protection.
Precautions
- Engine should be cool and stable. Use a center stand or lift.
- Drain the oil completely before opening the crankcase.
- Label bolts and parts for correct reassembly.
- Work in a clean area to prevent contamination.
- Inspect all parts before reinstalling, especially the separator plates and the set bar.
Step-by-Step Removal Instructions
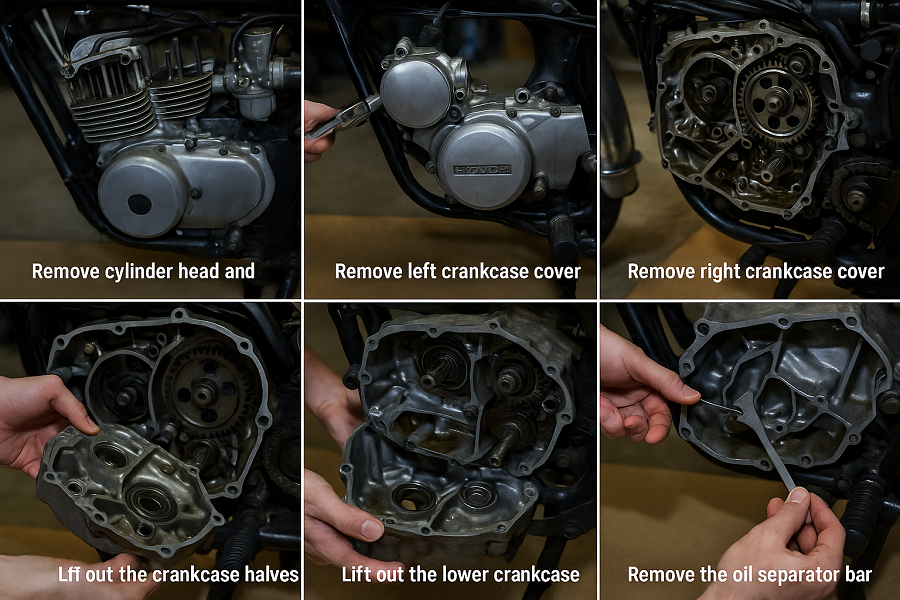
1. Remove Cylinder Head and Cylinder
Start by removing the carburetors, cylinder head cover, cylinder head, and then the cylinder itself. This exposes the crankcase area for separation.
2. Remove Left Crankcase Cover
Take off the left crankcase cover (generator side), disconnect the stator wiring, and remove the oil filter and oil pump if needed. Also remove the kickstarter components and clutch outer cover.
3. Remove Right Crankcase Cover
Unscrew and remove the right-side crankcase cover (points or switch housing). Remove any wiring or small parts as needed.
4. Separate the Crankcase Halves
Remove all crankcase bolts (including any hidden under rubber plugs). Gently tap the crankcase halves apart using a rubber mallet or case splitter tool.
5. Lift Out the Lower Crankcase
Once the crankcase is open, remove the lower half. This will expose the separator bar and oil deflector plates inside the sump.
6. Remove the Oil Separator Bar
Locate the long metal rod securing the plates. Grasp it with pliers or a magnet and pull it straight out toward the front of the engine. Once removed, the oil separator plates will come out freely.
7. Clean and Inspect
Thoroughly clean the crankcase interior. Inspect the plates and bar for rust or damage. Clean or replace as necessary.
Reassembly Tips
- Reinstall the separator plates and slide the set bar through them in the original orientation.
- Clean mating surfaces and apply fresh gasket or RTV sealant.
- Reassemble crankcase halves, tightening bolts in a crisscross pattern to factory torque specs.
- Replace engine oil, reassemble top end, and reconnect all wiring and covers.
Final Checks
- Double-check that the separator plates are correctly aligned.
- Ensure no tools or debris are left inside the engine.
- Start the engine and inspect for leaks or abnormal noises.
Leave a Reply